Workflows
Chain operators into DAG-based processing pipelines with conditional logic and error handling.
Workflows chain multiple operators into directed acyclic graph (DAG) processing pipelines. Each node in the workflow runs an operator, and edges between nodes define data dependencies: a downstream node can access the results of its upstream dependencies. Workflows support conditional execution, configurable error handling, ephemeral (non-persisted) intermediate results, automatic triggering on document upload, and YAML import/export for version control.
Building a Workflow
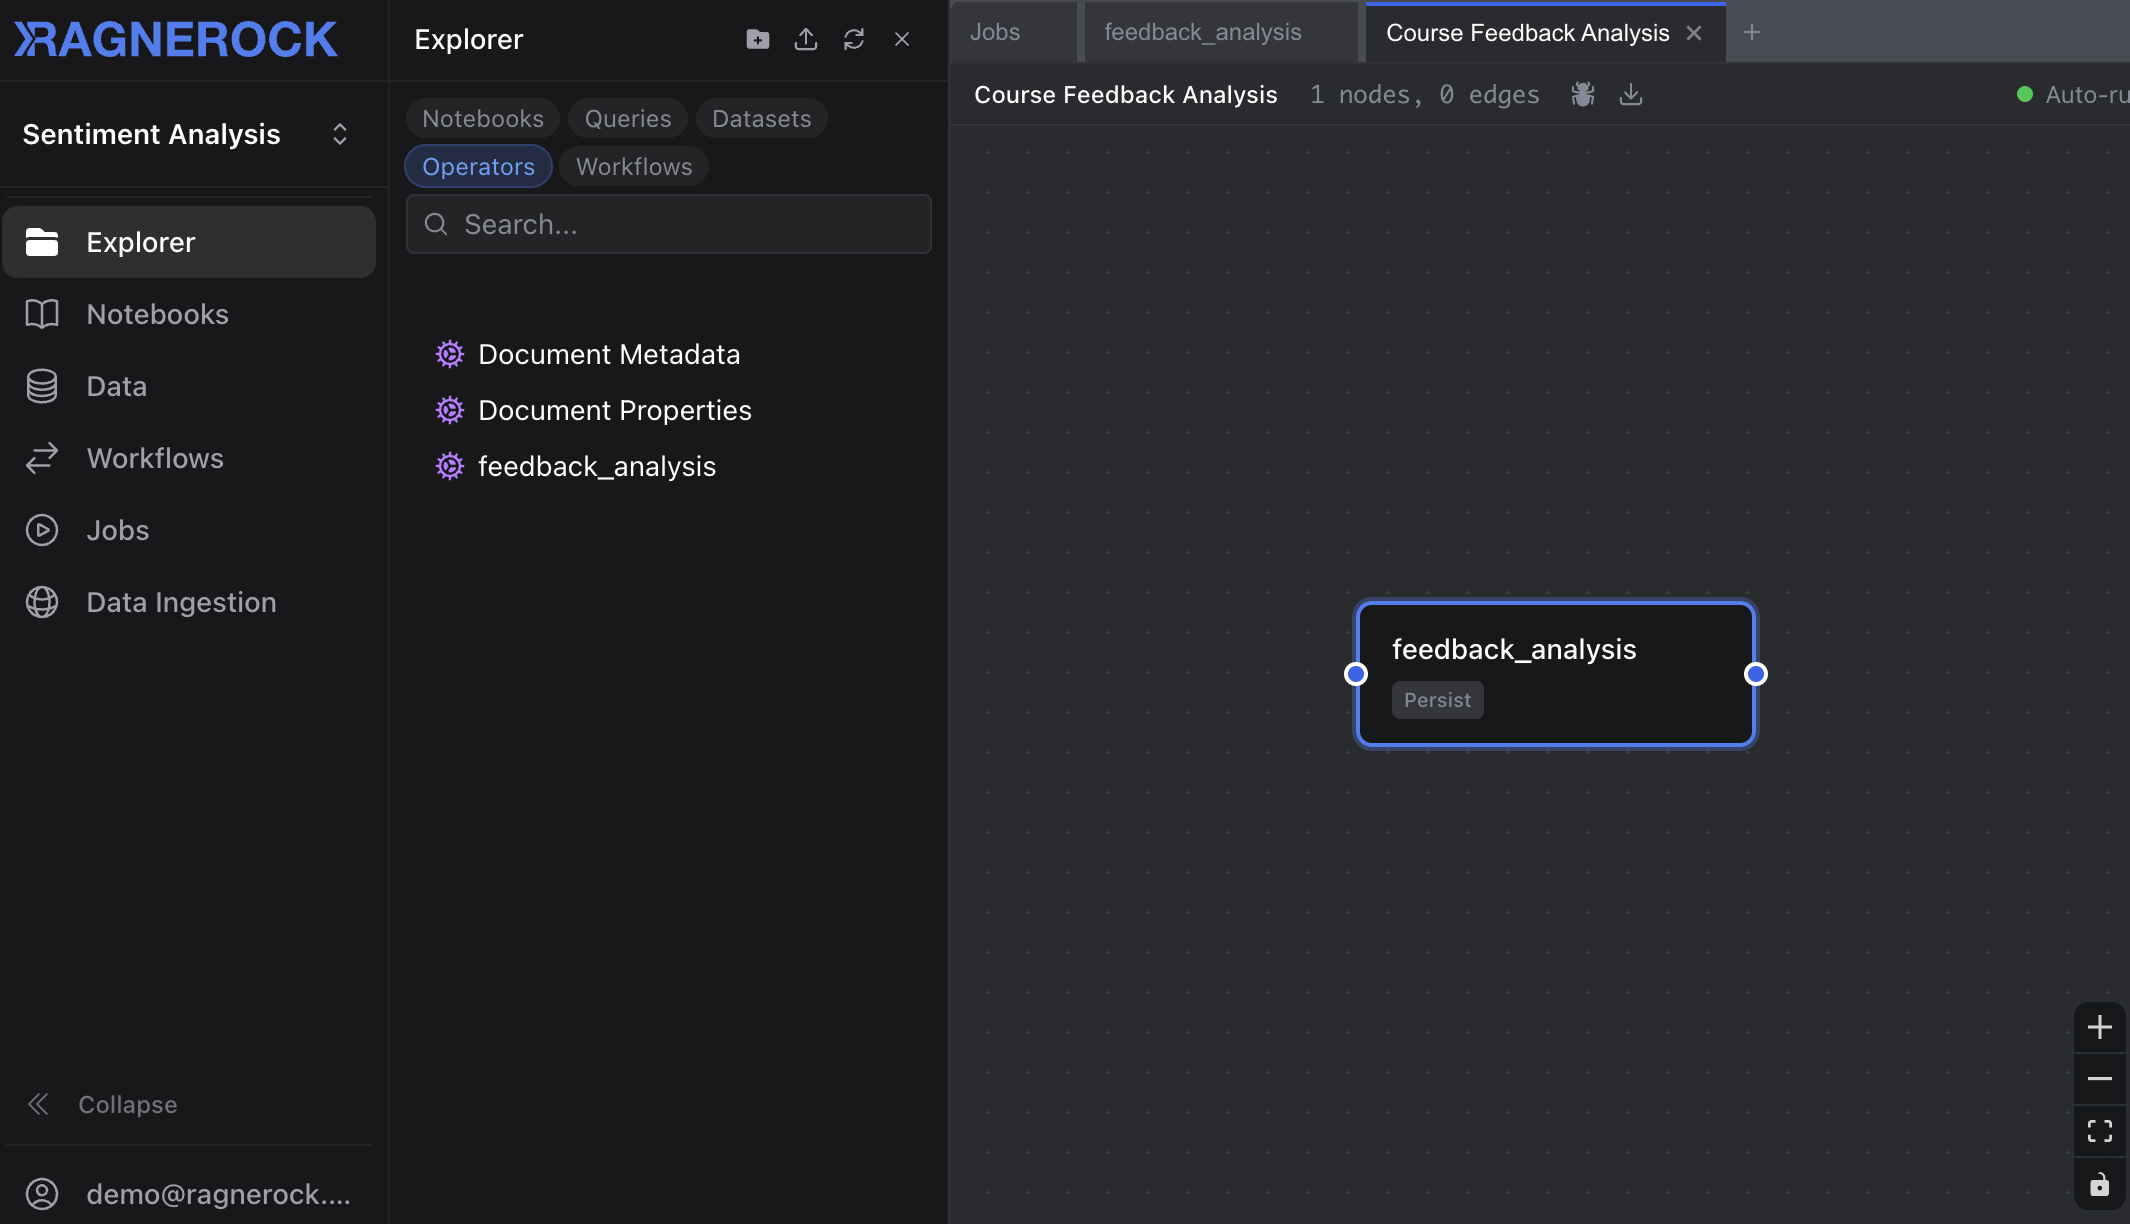
Navigate to the Workflows section in the sidebar and click New Workflow to open the visual graph editor.
Step-by-Step
-
Name your workflow: Enter a name and optional description. Toggle Auto-run on upload if you want this workflow to execute automatically when new documents are added to the project.
-
Add operator nodes: Click the operator palette on the left side of the canvas and drag operators onto the graph. Each node wraps an existing operator that you’ve created.
-
Connect nodes: Click an output port on one node and drag to an input port on another to create an edge. Edges define data dependencies: a downstream node receives the annotation results of its direct upstream dependencies as context for its LLM prompt.
-
Configure each node: Click a node to open its configuration panel on the right side. Here you can set:
- Condition: An optional rule that determines whether this node runs for a given document (see Conditional Execution)
- Error handling: What happens if the operator fails (see Error Handling)
- Persist: Whether to save the annotations to the database or keep them ephemeral (see Ephemeral Annotations)
- Annotations only: Whether to suppress raw document content and use only upstream annotation results as input (see Cross-Scope Aggregation)
-
Save: Click Save in the toolbar to persist your workflow.
Running a Workflow
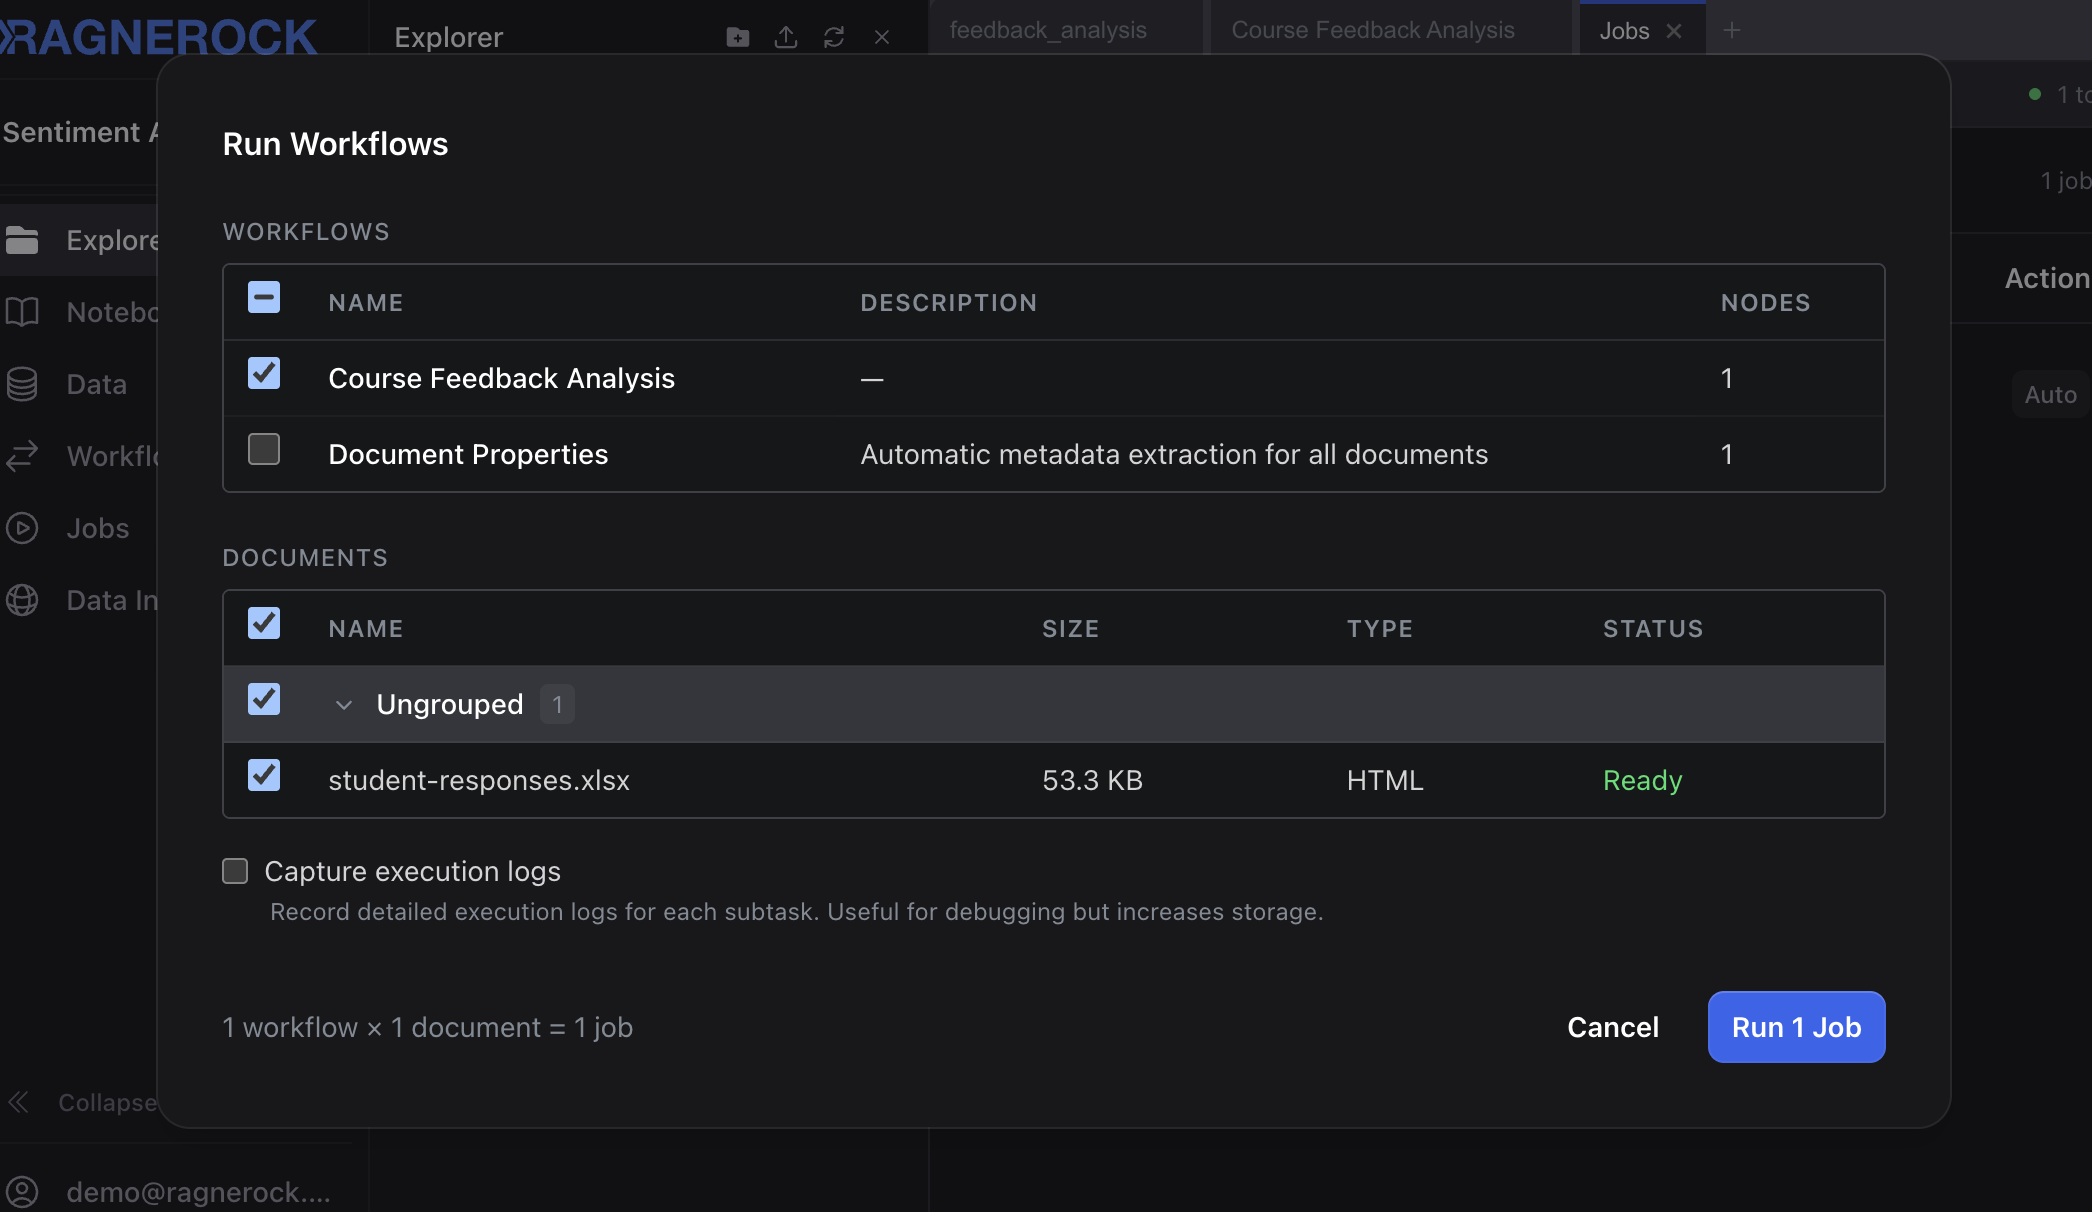
To run a workflow on your documents:
- Open the workflow and click Run in the toolbar, or right-click a workflow in the sidebar and select Run
- In the dialog, select the documents to process (use search and filters to find specific documents)
- Click Run Workflow
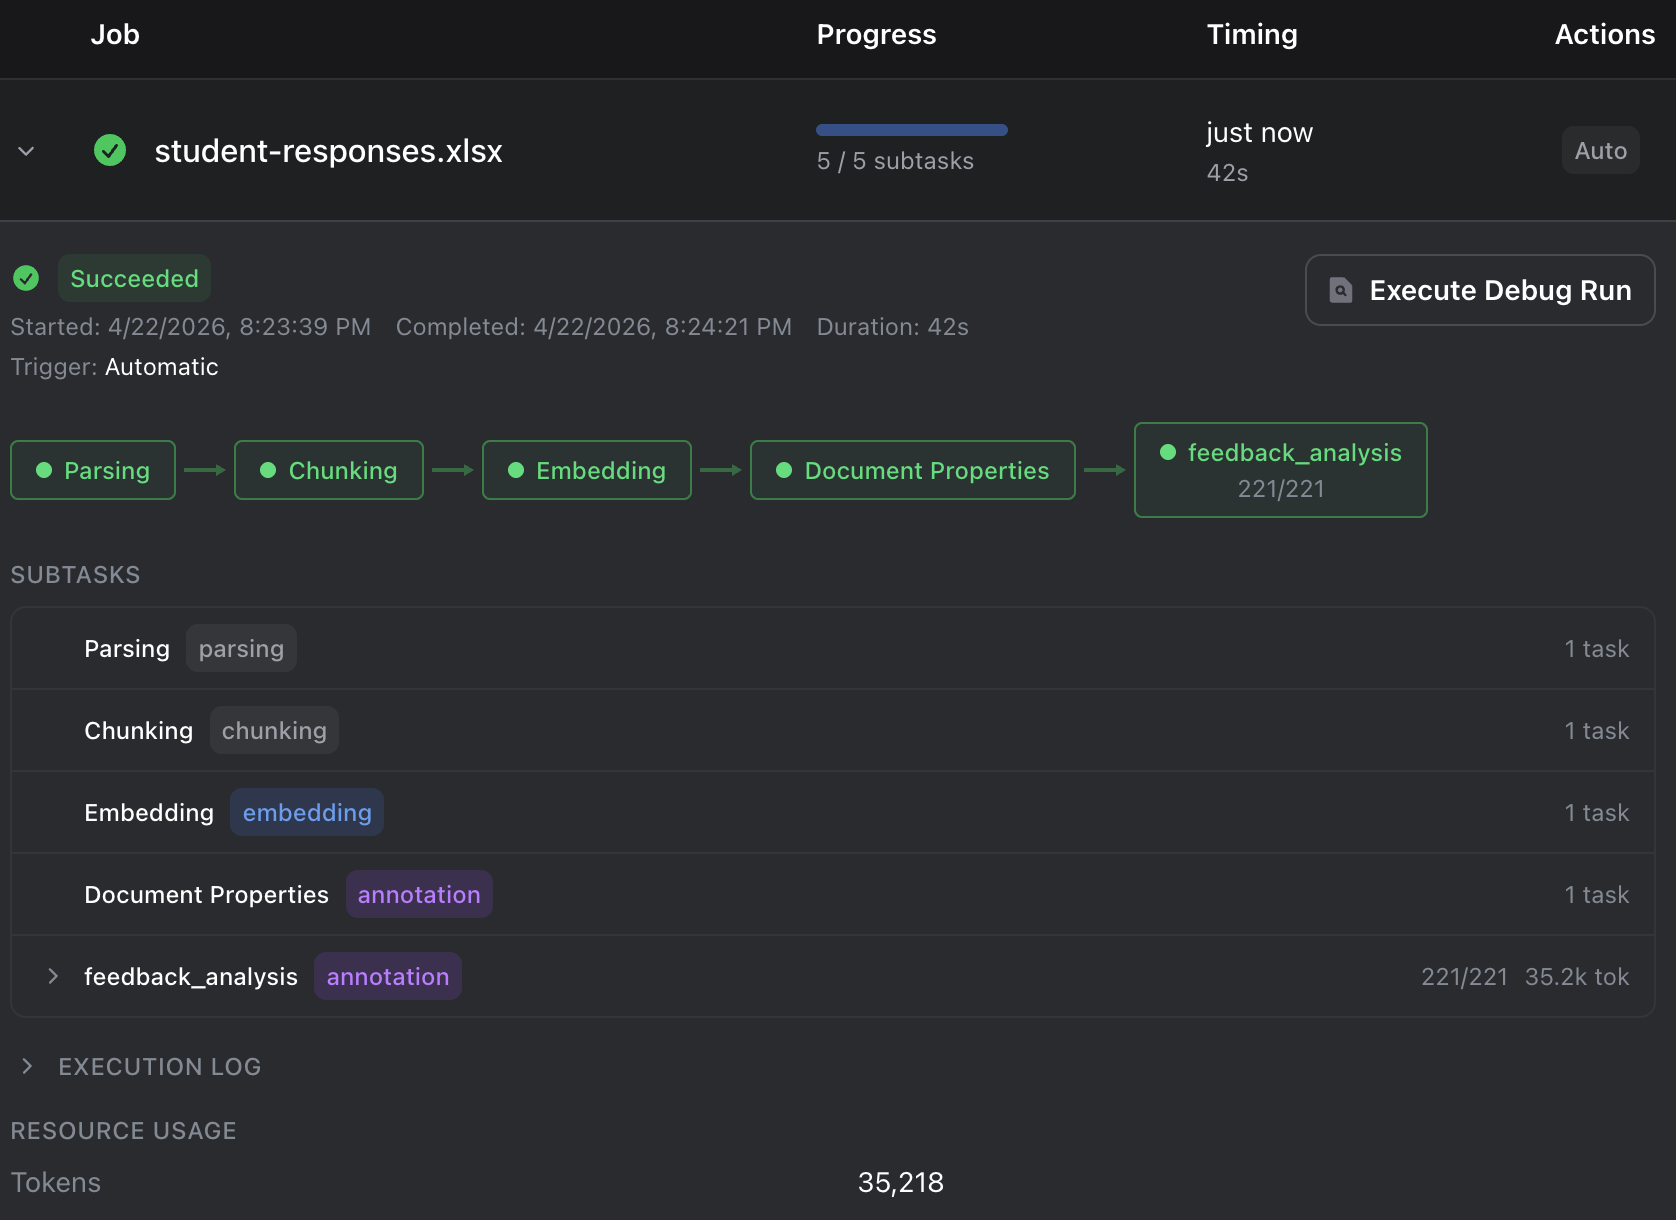
Monitor execution progress in the Jobs panel. Each job shows a timeline of execution stages, per-document subtask status, and detailed logs.
Execution Order
Ragnerock determines execution order using topological sort. Nodes with no upstream dependencies (roots) run first, followed by nodes whose dependencies have all completed. This ensures every node has access to the results it needs before it executes.
The execution order is cached on the workflow and recomputed automatically whenever you add, remove, or reconnect nodes. If your graph contains a cycle (e.g., Node A depends on Node B, which depends on Node A), the editor rejects the connection and reports an error. DAGs must be acyclic by definition.
Key behaviors:
- Nodes at the same depth in the graph can execute in parallel
- The execution order is deterministic for a given graph structure
- Adding or removing a node triggers recomputation of the cached order
Conditional Execution
Each workflow node can have an optional condition that controls whether it executes for a given document. Conditions are evaluated against the annotation results of the node’s direct upstream dependencies. If the condition evaluates to false, the node is skipped for that document.
To configure a condition, click a node in the workflow editor to open its configuration panel, then expand the Condition section.
Conditions reference upstream results using field paths in the format {operator_name}.{field}, where operator_name is the programmatic name of the upstream operator (lowercase, spaces replaced with underscores). For example, if the upstream operator is named “Sentiment Analysis” and it produces a score field, reference it as sentiment_analysis.score.
Field Comparison
Select Field Comparison in the condition builder. Choose the upstream field, a comparison operator, and a value. For example, to run a node only when the upstream sentiment score is at least 0.7: select the field sentiment_analysis.score, set the operator to >=, and enter the value 0.7.
The following comparison operators are available in the condition builder:
| Operator | Description | Example |
|---|---|---|
== | Equal to | category == "financial" |
!= | Not equal to | category != "irrelevant" |
> | Greater than | score > 0.8 |
< | Less than | risk_level < 3 |
>= | Greater than or equal | confidence >= 0.5 |
<= | Less than or equal | count <= 100 |
matches | Regex pattern match | topic matches "^earnings" |
Type coercion is applied automatically ("5" equals 5, true equals 1) so conditions work even when upstream types are slightly inconsistent.
List Operations
Select List Operation to perform operations on array fields produced by upstream operators. For example, to check if an upstream entity list contains a specific company: select the field entity_extraction.organizations, set the operation to contains, and enter the value "Apple Inc.".
The following list operations are available:
| Operation | Description | Requires comparison | Example |
|---|---|---|---|
contains | Check if value exists in list | No | organizations contains "Apple Inc." |
count | Compare list length | Yes | entities count >= 3 |
min | Compare minimum element | Yes | scores min > 0.5 |
max | Compare maximum element | Yes | scores max < 100 |
For count, min, and max, you also select a comparison operator (==, !=, >, <, >=, <=) and enter a comparison value.
Logical Operators
Select AND, OR, or NOT to compose multiple conditions. Each sub-condition is configured the same way, as a field comparison, list operation, or another logical group. This lets you build rules like “category is not irrelevant AND at least one organization was extracted.”
NOT negates a single condition. The node runs only when the inner condition is false.
Logical operators nest arbitrarily. You can put an AND inside an OR, or a NOT around a complex expression.
Condition Safety
If a referenced field is missing from the upstream results (e.g., the upstream operator didn’t produce that field for a particular document), the condition evaluates to false and the node is skipped. This fail-safe prevents downstream nodes from running on incomplete data.
Cross-Scope Aggregation
When an operator at a finer scope (e.g., Paragraph) feeds into an operator at a coarser scope (e.g., Document), the downstream operator receives the upstream results as an aggregated list. This enables patterns like “detect at the paragraph level, then summarize at the document level.”
How It Works
- Create a finer-scoped operator (e.g., a Paragraph-scoped “Topic Detector” that extracts a
topicand anis_relevantboolean from each paragraph) - Create a coarser-scoped operator (e.g., a Document-scoped “Topic Summary” that summarizes the topics found across the document)
- Connect them in a workflow: drag an edge from the finer-scoped node to the coarser-scoped node
When the workflow runs, the downstream operator receives all upstream annotations collected into a list. Its generation prompt is automatically augmented with this aggregated context, so you can write prompts like: “Summarize the topics identified across all paragraphs.”
Filtering with Conditions
Conditions work differently on aggregation nodes. Instead of controlling whether the operator runs (a gate), the condition acts as a filter on individual upstream annotations. Only annotations that pass the condition are included in the aggregated list.
The workflow editor shows a Filter badge on the condition panel when this mode is active, so you always know how your condition will be applied.
Example: A Paragraph-scoped operator produces an is_relevant boolean. A downstream Document-scoped operator has a condition: topic_detector.is_relevant == true. When the workflow runs, only paragraphs where is_relevant is true are included in the aggregated list. Paragraphs where is_relevant is false are excluded.
For same-scope connections (e.g., Document → Document), conditions continue to work as gates — the operator runs or is skipped based on the condition. The editor shows a Gate badge in this case.
Skip on Empty
If a condition filter removes all upstream annotations (none pass the filter), the downstream operator is automatically skipped. No LLM call is made, and no annotation is produced. This prevents wasted processing when there’s nothing relevant to aggregate.
Annotations-Only Mode
Toggle Annotations only on a node to suppress the raw document content in the operator’s prompt. The operator receives only the aggregated upstream annotations as its input context.
This is useful when the downstream operator doesn’t need to read the original document — it just needs to work with the distilled results from upstream. For example, a “Banana Counter” operator that counts how many paragraphs mentioned bananas doesn’t need to re-read the full document; it only needs the list of upstream detection results.
Annotations only is available on any node that has upstream dependencies. It cannot be enabled on root nodes (nodes with no upstream connections).
Worked Example: Paragraph Detection → Document Summary
This example builds a two-node pipeline that detects topics at the paragraph level and produces a filtered summary at the document level.
Node 1: Topic Detector (Paragraph scope, persisted)
- Extracts
topic(string) andis_relevant(boolean) from each paragraph - No condition — runs on every paragraph
Node 2: Topic Summary (Document scope, persisted, annotations only)
- Summarizes the relevant topics found across the document
- Condition:
topic_detector.is_relevant == true(Filter mode — only relevant paragraphs are aggregated) - Annotations only: enabled (the summary is based purely on detected topics, not the raw document text)
When a document has 10 paragraphs and 4 are marked as relevant, Node 2 receives only those 4 paragraphs’ topic annotations and produces a focused summary. If none are relevant, Node 2 is skipped entirely.
Error Handling
Each node has a configurable error handling strategy that determines what happens if the operator fails for a document:
| Strategy | Behavior | Use When |
|---|---|---|
| SKIP_NODE (default) | Skip the failed node and continue the workflow. Downstream nodes execute without the failed node’s results. | Production resilience: partial results are acceptable |
| FAIL_JOB | Fail the entire job immediately. No further nodes execute. | Accuracy is critical: partial results are unacceptable |
| RETRY | Retry the failed node up to max_retries times before falling back to skip or fail behavior. | Transient errors (rate limits, timeouts) |
Set the error strategy per node in the configuration panel. SKIP_NODE is the recommended default: it keeps the pipeline running even when individual extractions fail, and the failed items are logged for review.
Ephemeral Annotations
By default, every node’s annotations are persisted to the database and become queryable via SQL. For intermediate processing steps where you only need the results as input to downstream nodes, toggle Persist off on the node.
Ephemeral annotations are:
- Generated normally: The operator runs and produces structured output
- Available to downstream nodes: Downstream operators see ephemeral results in their upstream context
- Not written to the database: They don’t appear in query results, don’t consume storage, and don’t clutter your annotation tables
When to use ephemeral annotations:
- Intermediate classification steps that only exist to route documents through conditional branches
- Preprocessing steps that normalize or enrich data before a final extraction
- Any node whose output is only meaningful as input to another node
Auto-Run on Upload
When Auto-run on upload is enabled on a workflow, it triggers automatically whenever new documents are uploaded to the project. This is useful for standardized processing pipelines: upload a batch of earnings calls and have them automatically classified, annotated, and scored without manual intervention.
Disable auto-run for workflows you only want to trigger manually (e.g., experimental pipelines, one-off analyses).
YAML Import/Export
Workflows can be exported as YAML files and imported into the same or different projects. YAML import/export supports an analysis-as-code paradigm inspired by Kubernetes declarative configuration. Workflow YAMLs are configuration you can track and version in source control, separately from Ragnerock, enabling reproducible analysis pipelines across teams and environments.
Export
Export a workflow from the toolbar menu. The YAML file captures the complete workflow definition: operators, schemas, prompts, node positions, conditions, error strategies, and connections:
version: "1"
workflow:
  name: "Earnings Call Analysis"
  description: "Multi-stage pipeline for earnings call processing"
  is_active: true
  auto_run_on_upload: true
operators:
  - name: "Document Classification"
    description: "Classify document type and relevance"
    generation_prompt: |
      Classify this document by type and assess its relevance
      to equity research...
    chunk_type: "document"
    batch_size: null
    multi_annotation: false
    jsonschema:
      type: object
      properties:
        category:
          type: string
          enum: ["earnings_call", "10-K", "10-Q", "research_note", "other"]
        relevance:
          type: number
          minimum: 0
          maximum: 1
      required: ["category", "relevance"]
  - name: "Sentiment Analysis"
    description: "Extract overall sentiment"
    generation_prompt: |
      Analyze sentiment toward the company's future performance...
    chunk_type: "document"
    batch_size: null
    multi_annotation: false
    jsonschema:
      type: object
      properties:
        overall_sentiment:
          type: string
          enum: ["very_negative", "negative", "neutral", "positive", "very_positive"]
        confidence:
          type: number
          minimum: 0
          maximum: 1
      required: ["overall_sentiment", "confidence"]
nodes:
  - operator: "Document Classification"
    condition: null
    persist: true
    annotations_only: false
    on_error: "skip_node"
    max_retries: 0
    position:
      x: 100
      y: 200
      z: 0
    connections:
      in: []
      out: [1]
  - operator: "Sentiment Analysis"
    condition:
      type: field_comparison
      field_path: document_classification.relevance
      operator: ">="
      value: 0.5
    persist: true
    annotations_only: false
    on_error: "skip_node"
    max_retries: 0
    position:
      x: 400
      y: 200
      z: 0
    connections:
      in: [0]
      out: []
Import
Import a YAML file via the workflow toolbar. The import process:
- Creates or updates operators: Operators in the YAML are matched by name. New operators are created; existing ones are updated with the imported definition.
- Creates the workflow: Workflow metadata (name, description, flags) is applied.
- Creates nodes and connections: Nodes are created with their operator references, conditions, and error strategies, then edges are wired up.
- Validates the graph: Cycle detection runs on the imported connections. Invalid graphs are rejected.
Import validation checks for: valid YAML structure, version compatibility, required operator fields (name, prompt, schema, chunk type), valid error strategy names, and connection indices within bounds.
Worked Example: Multi-Stage Document Analysis
This example builds a four-node pipeline that classifies documents, extracts entities from relevant ones, computes sentiment as an intermediate signal, and produces a final risk assessment for documents with negative sentiment.
Pipeline Structure
The pipeline has four stages:
- Document Classification > 2. Entity Extraction > 3. Sentiment Analysis (ephemeral) > 4. Risk Assessment
Each stage gates the next through a condition, so only relevant documents flow through the full pipeline.
Node Configurations
Node 1: Document Classification: Root node, no condition, always runs. Classifies each document’s type and relevance. Persisted so you can query classification results directly.
Node 2: Entity Extraction: Paragraph-scoped, persisted. Only runs if the upstream classification says the document is not irrelevant. Configure a Field Comparison condition: set field to document_classification.category, operator to !=, and value to "irrelevant".
Node 3: Sentiment Analysis: Document-scoped, ephemeral (Persist toggled off). Serves only as an intermediate signal for the risk assessment node. Only runs if at least one entity was extracted. Configure a List Operation condition: set field to entity_extraction.entities, operation to count, comparison to >=, and value to 1.
Node 4: Risk Assessment: Document-scoped, persisted. Runs only when sentiment is negative. Configure a Logical OR condition with two sub-conditions:
- Field Comparison:
sentiment_analysis.overall_sentiment == "negative" - Field Comparison:
sentiment_analysis.overall_sentiment == "very_negative"
Running the Pipeline
Open the “Document Analysis Pipeline” workflow in the editor and click Run. Select all documents in the run dialog and click Run Workflow. Monitor progress in the Jobs panel. The timeline view shows each node’s execution stage.
Querying the Results
Since Sentiment Analysis is ephemeral, it doesn’t appear in query results. The persisted nodes (Document Classification, Entity Extraction, and Risk Assessment) are queryable. Open the Query Explorer and run:
-- Which documents were flagged as risky?
SELECT
    document_name,
    risk_level,
    risk_factors,
    confidence
FROM risk_assessment
WHERE risk_level IN ('high', 'critical')
ORDER BY confidence DESC
-- What entities appear most frequently in relevant documents?
SELECT
name,
type,
COUNT(*) as mentions
FROM entity_extraction
GROUP BY name, type
ORDER BY mentions DESC
LIMIT 20Best Practices
-
Keep operators focused: Each operator should extract one concept. Use workflows to compose multiple extractions rather than building a single massive operator that tries to do everything.
-
Use ephemeral nodes for intermediates: If a node’s output is only needed as input to downstream nodes, toggle Persist off to keep your annotation tables clean and reduce storage.
-
Start with SKIP_NODE error handling: The default strategy keeps your pipeline running even when individual extractions fail. Switch to FAIL_JOB only when partial results would be misleading.
-
Test on a small sample first: Run your workflow on 2-3 representative documents before processing your entire corpus. Check that conditions fire correctly and downstream nodes receive the expected context.
-
Use YAML export for version control: Export your workflows as YAML and commit them to your repository. This gives you change history, code review, and the ability to reproduce pipelines across environments.
-
Design conditions to fail safely: Conditions that reference missing fields evaluate to
false, skipping the node. Structure your conditions so that a missing upstream result means the downstream node shouldn’t run anyway. -
Use aggregation for cross-scope analysis: When you need to detect patterns at a fine scope and summarize at a coarse scope, connect a finer-scoped operator to a coarser-scoped one. Add a condition to filter which upstream results are included, and enable annotations-only mode when the summary doesn’t need raw document content.
Next Steps
- Operators: Deep dive into schema design, prompts, and scopes
- Annotations: Core concepts and usage
- Queries: SQL reference and Query Explorer