JupyterLab Integration
Connect your JupyterLab environment to Ragnerock for local code execution and DataFrame imports.
Ragnerock notebooks can execute Python code cells in a JupyterLab kernel running on your machine or any accessible host. This gives you access to your local packages, data, and environment, and lets you import query results and agent-produced DataFrames directly into your kernel for analysis.
No Ragnerock-specific packages are needed in your Jupyter environment. The connection is handled entirely through the browser.
Connecting to JupyterLab
Start JupyterLab with CORS Configured
Start JupyterLab with settings that allow Ragnerock to connect:
jupyter lab --allow-root --no-browser --port=8888 \
    --NotebookApp.allow_origin='*' \
    --NotebookApp.allow_credentials=True \
    --NotebookApp.disable_check_xsrf=True
Note the URL and token printed in the terminal output. You’ll need these in the next step. The output will look something like:
http://localhost:8888/lab?token=abc123...
Connect from a Ragnerock Notebook
- Open a notebook in Ragnerock
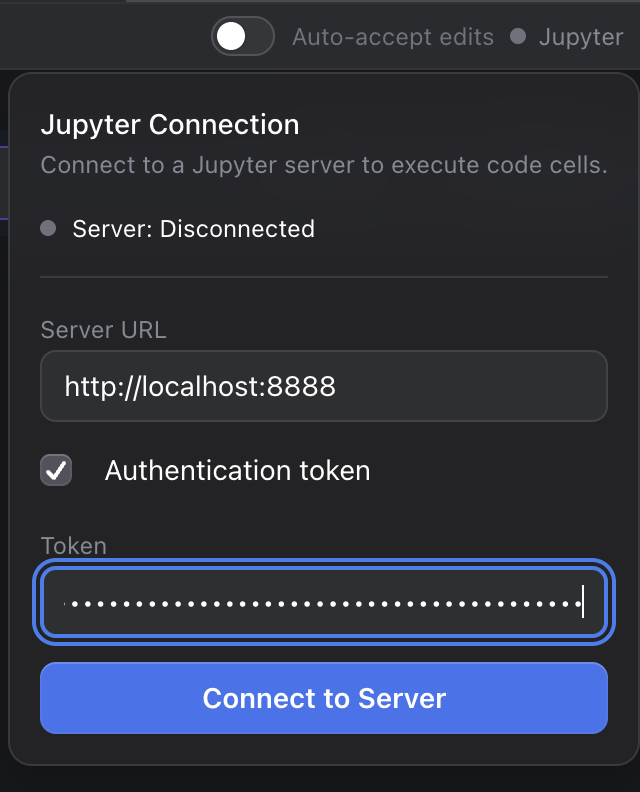
- Click the Jupyter button in the top-right corner of the notebook panel
- Enter the host URL (e.g.,
http://localhost:8888) and the token from your JupyterLab instance - Click Connect
Start or Select a Kernel
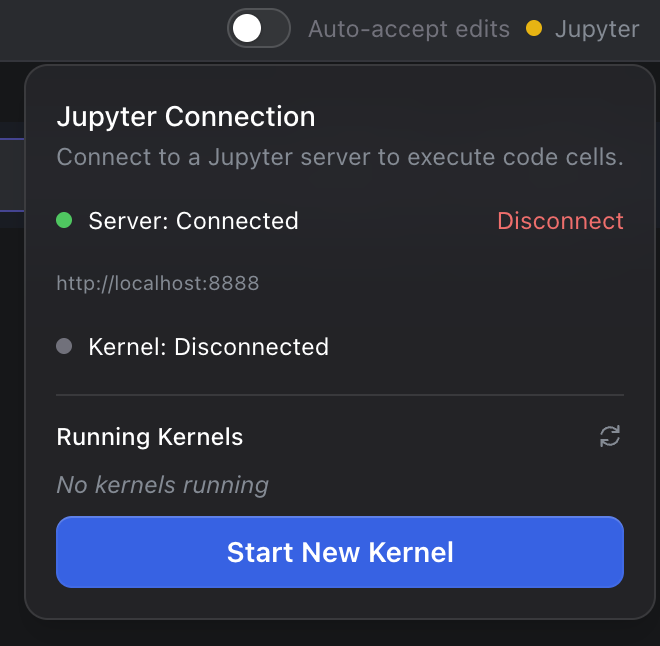
After connecting:
- Click Start a kernel to create and attach to a new one, or
- Select an existing kernel from the list to connect to it
Once attached, all Python code cells in your Ragnerock notebook execute in that JupyterLab kernel.
Code Execution
Once connected, code cells in the notebook execute in your JupyterLab kernel with full access to:
- Your locally installed Python packages: pandas, scikit-learn, custom libraries, anything in your environment
- Local file system paths:
pd.read_csv("/path/to/local/data.csv") - Environment variables and credentials configured on your machine
- Running services on your local network: databases, APIs, other tools
Kernel state persists across cells within a session. Variables from earlier code cells remain in memory, so you can import multiple DataFrame artifacts and work with them all.
# This runs in YOUR Jupyter kernel with YOUR packages
import pandas as pd
import numpy as np

# Your local packages are available
from my_analysis_toolkit import risk_model

# Data imported from query cell artifacts works seamlessly
df = pd.DataFrame(query_results)
print(df.describe())
DataFrame Import
When the Research Agent or a query cell produces a DataFrame artifact, you can import it directly into your Jupyter kernel:
- Click the artifact badge in the notebook cell (shows the table dimensions, e.g., “150 x 8”)
- Choose a variable name (defaults to a snake_case version of the artifact title)
- Click Import DataFrame
The data appears in your kernel immediately. No code cells are added to your notebook. The variable is available in your next cell execution.
Data Format
Imported data arrives as a list of dictionaries (Python’s records format):
customer_analysis = [
    {"id": 1, "name": "John Doe", "email": "john@example.com", "revenue": 50000},
    {"id": 2, "name": "Jane Smith", "email": "jane@example.com", "revenue": 75000},
    ...
]
This format is deliberately library-agnostic. It uses only built-in Python types, so it works regardless of which data library you prefer.
Working with Imported Data
Once a variable is in your kernel, convert it to whichever library you use:
# Pandas
import pandas as pd
df = pd.DataFrame(customer_analysis)

# Polars
import polars as pl
df = pl.DataFrame(customer_analysis)

# DuckDB (query the variable directly by name)
import duckdb
duckdb.query("SELECT * FROM customer_analysis WHERE revenue > 60000")

# Raw Python
for record in customer_analysis:
    if record["revenue"] > 60000:
        print(record["name"])
Architecture
DataFrame imports are entirely client-side. The Jupyter kernel never contacts the Ragnerock server directly.
┌─────────────┐                    ┌──────────────┐
│   Browser   │                    │   Ragnerock  │
│  (Frontend) │<---- HTTPS ------->│   Backend    │
└─────────────┘                    └──────────────┘
       │
       │ WebSocket
       │ (Jupyter Protocol)
       v
┌─────────────┐
│   Jupyter   │
│   Kernel    │
│   (Local)   │
└─────────────┘
The data flow works like this:
- The browser fetches the artifact data from the Ragnerock API
- The browser constructs a Python assignment statement with the data inlined
- The browser sends that code to the Jupyter kernel over WebSocket
- The kernel executes the code and stores the variable in its namespace
- The variable is immediately available in your notebook cells
Because the kernel only receives data from the browser, there is no need to configure network access or API credentials inside the kernel for imports.
Handling Large DataFrames
For DataFrames larger than 1 MB, the import uses chunked transfer. The data is split into smaller pieces and reassembled in the kernel. This avoids WebSocket message-size limits while keeping the import seamless.
Typical import performance:
| Rows x Columns | Approximate Size | Import Time |
|---|---|---|
| 1,000 x 10 | ~100 KB | < 100 ms |
| 10,000 x 10 | ~1 MB | < 500 ms |
| 100,000 x 10 | ~10 MB | < 2 s |
| 1,000,000 x 10 | ~100 MB | < 10 s |
For very large datasets, consider filtering or aggregating in the Research Agent or Query Explorer before importing.
Advanced Configuration
Remote Hosts
JupyterLab can run on a remote server, VM, or container, as long as your browser can reach it and CORS is configured. Replace localhost with your remote host’s address when connecting.
Multiple Notebooks, One Kernel
Multiple Ragnerock notebooks can connect to the same JupyterLab kernel to share state between them. Variables imported or created in one notebook are available in all notebooks attached to the same kernel.
Kernel Selection
After connecting to a JupyterLab instance, you can start a new kernel or attach to an existing one. Attaching to an existing kernel is useful when you want to share state with a JupyterLab notebook you already have open. Variables, imports, and session state are all shared.
Complete Workflow
A typical end-to-end workflow combining the Research Agent with your Jupyter environment:
- Ask the Research Agent questions in message cells to get synthesized answers with DataFrame artifacts
- Query structured data in query cells to pull operator results as DataFrame artifacts
- Import artifacts into your Jupyter kernel so data flows into your local environment
- Analyze with your full toolkit: custom libraries, local data, ML models, visualization tools
# Import an artifact from a query cell, then combine with local data
import pandas as pd

# query_results imported from a query cell artifact
ragnerock_df = pd.DataFrame(query_results)

# Load local reference data
local_benchmarks = pd.read_csv("~/data/industry_benchmarks.csv")

# Combine and analyze
merged = ragnerock_df.merge(local_benchmarks, on="sector")
print(merged[["company", "revenue", "benchmark_revenue", "delta"]].head(10))
Next Steps
- Jupyter Integration Tutorial: Step-by-step setup walkthrough
- Notebooks: Cell types, artifacts, and the conversational workflow
- AI Research Agent: Agent capabilities that produce importable DataFrames